
Update: New DifficultChoiceModb6, Decent Rocks
This is a list of all Moo2 mods I am aware of. Please add a comment when you know further mods. I will try to update this list.
Firstly, before I start with the pure mods I recommend to update the last official 1.31 patch with the:
Master of Orion II v1.40 patch
by LordBrazen
To clarify: His masterpiece deserves to be called patch because not only does it fix the most important bugs of 1.31 it also allows for the multiplayer DOS game to be playable with XP. Additionally, all mods offered by LordBrazen are optional. So you can use 1.40 as a pure patch when you dislike mods.
Download the latest version: http://lordbrazen.blogspot.com/2005/01/download.html
Details http://lordbrazen.blogspot.com/2005/01/moo2v140-patch-faq.html
Comment This patch can coexist with the 1.31 patch (a new exe is generated). Besides his bug fixes it includes very popular mods of the map generator (optional) for better MP-maps (less restarts). Additionally, there are four further mods implemented (of course also optional): pick switch (10-14 positive picks), droid switch (free droids for all), the very popular noreport switch (you can't see the spies and techs of your opponents) and the new galaxy age post warp (you start with all techs up to 250RPs). Post Warp Games are quite fast. I recommend to try them in huge galaxies. (see the above mentioned faq for switch details). Since 1.40b22, the patch contains the interesing noscan, nohousing and nonebula switches. Besides the new cluster galaxy (large gal with 72 stars) there are further bug fixes.
Update: 1.40b23 fixed several redraw bugs (less crashes, for example the tractor beams bug is fixed now) and the blackhole generator works now with enabled shipinitiative.
Further optional mods are planned for the next releases. Visit also his Community Forum for further information. Register there, present and discuss your suggestions.
The next three mods are also listed on the right side bar and they can coexist with the 1.4 patch (no backup necessary):
Demo Dict Mod
Download DDModb8.zip
Details
Comment We have just updated this mod where we try to help the demo and dict races with earlier morale techs (Unification is far too strong in our MP-games). ALEXD and I came to the conclusion that a small mod with just few changes would be fine. This mod contains better map balance, earlier morale techs (holo sim 400, vnet in supercomps field, psionics 650 sociology), telepathic training and neural scanners were swapped and the racepicks are identical to the next mod:
Difficult Choice Mod
Download DCmodb6.zip
Details
Comment Additionally to the DD Mod many changes in the techtree - In any techfield you should have a difficult choice - therefore, the absolutely must haves like auto factories or research labs are singletons and a lot of underpowered techs are improved. See also the DC thread in LBs forum.
Decent Rocks
Download
Details
Comment This mod is called DecentRocks since the tiny and small rocks (i.e. Barren, Radiated, Toxic etc.) have now a decent size.
Orange Mod and GoodMap Mods
Download Orange_b23.zip and GoodMaps.zip
Details
Comment This is 1.40b23 with modded maps.
INver Mod
by INver
Download RACESTUF.LBX
Comment Subt and Warlord for free. Small fine mod of the racestuf.lbx for MP games.
1.32 Mod
by 4381 et al.
Download 132MOD.zip
Details http://www.masteroforion2.com/patch132.htm
Comment Autofacts and Research Labs for free. Techtree, Racepick costs and Leader changes. Tiny frigates.
Mictian Mod v0.53
by Mictian
Download http://laaja.org/moo2/MictianMod.zip
Details http://laaja.org/moo2/
Comment win version mod - Just backup the orion95.exe and techname.lbx
Some techs are in new techfields - large RP increases for endgame techfields
Defensive "AntiBlitz" Mod
by Jukka Mikkonen
Download AntiBlitzMod.zip
Details http://users.tkk.fi/~jmikkone/
win version mod - Just backup the orion95.exe, help.lbx and techname.lbx
Major changes: Missile Base has 800 (instead of 300) space units - An upgrade to ship hit points, and even larger for star bases - Strong ground installation with 10x the hit points - Severely upgraded space monsters & Guardian of Orion, damagewise - Antarans should prove to be a threat once again - A few automatic techs, such as Auto-Factory, Fighter Bays, Fighter Garrison, Reinforced Hull and Heavy Armor.
Extreme Shield Mod
by Die Noob Die
Download http://de.geocities.com/londoxy
Comment Extremely strong shields and torpedoes
You need the OCL v0.21 to implement the files of the following mods into your exe:
Moomod
by mooncalf
Download http://ourworld.cs.com/moonkine/moo2/moomod_06.zip
Comment by mooncalf: It's mostly an attempt to more balance the weapons, buildings, ship systems and armor (to my understanding, anyway.) For example, significantly improved weapons include: torpedoes of all types, pulson and zeon missiles, maulers, and particle beams. Gauss cannon, phasors and disruptors have been toned down a bit. There are lots of other little tweaks that are documented in the included readme file.
Smiloid Mod
by Arc.Smiloid
Download ftp://ftp.sff.net/pub/people/zoetrope/MOO2/Utilities/Techs/OCL/Mods/smiloid.zip
Details
Comment Many changes in the combat system
How to build your own mod?
When you are familiar with hex editors I recommend once again to visit LordBrazen's Community Forum. Especially the section: Game Modifications: Information, How-to's, and discussion about mod'ing Master of Orion II. You will find lots of info there.
An almost complete archive of Moo2 editors can be found at: ftp://ftp.sff.net/pub/people/zoetrope/MOO2.
Another selection of well documented tools: http://lordbrazen.blogspot.com/2005/01/download.html. There are several Leader editors. (BTW, LordBrazen has a nice list of the Ship Officers and Colony Leaders.) Pickhack is nice when you want to edit the racepick costs. And last but not least there is LordBrazen's second masterpiece an update of the OCL editor: http://www.spheriumnorth.com/blog-images/OCLplusv0.3.zip
He works on further extensions. Stay tuned!
Keep me informed when you have a new mod.
5.11.05
Master of Orion II Mods - An Overview
2.11.05
Traffic
When I started this blog in 2004 I didn't care much about traffic. Helping the new players (the kali guide) was my motivation. (LordBrazen started his blog a year later and 4381 left kali and didn't update his kali help.)
I was surprised when LordBrazen told me that he has now more than 70 unique visitors per day. So I was also interested to analyze my traffic a bit. I registered for ClustrMaps last wednesday and included the thumbnail this weekend. When you enlarge it and chose the Map with smaller clusters it looks quite interesting. Then you will also see that the big red spot over germany is not just ALEX|D and me. In fact, almost completely western germany is covered with red spots. Well, ALEX|D has a superb google ranking and this helps me a lot. Thanks. I have also a nice success with search.msn.com and all together I have roundabout 50 unique visitors per day. (Didn't know how this ranking could happen and I swear that I will never criticize MS again.) But my google rankings are pretty bad. Nevertheless most search engine hits are still from google: When moo-users search for technical help (comm failure etc.) they hit often my kali guide. It seems there is still a lot of LAN besides kali.
Update: The last 2 months of 2005 produced following clustrmap:
ClustrMaps Oct-Dec 2005
19.10.05
DifficultChoiceMod b4
latest version can be found here:
http://masteroforion2.blogspot.com/2006/07/difficultchoicemod-b6.html
18.10.05
Maximum Population
Pop is the key factor in Master of Orion II. In this contribution I would like to illustrate the following computations:
How is the pop max value determined?
And how is this value affected by the Racepicks Aqua, Sub and Tol?
First, let us consider the different size classes:
1 = tiny, 2 = small, 3 = medium, 4 = large, 5 = huge
Starting point is the following consideration:
On a Gaia planet the entire surface is habitable and the max population value is then determined by:
(I) max popgaia= 5 * size class
(This relation applies in the current version but actually the formula is not used, you can modify these 5 gaia values separately.)
Thus 5 pop on a tiny gaia, 10 pop on small gaia up to 25 pop for a huge gaia. These 5 max pop gaia values are the so called size multipliers.
However, on planets with other climatic conditions only a smaller part of the entire surface is habitable. For a race without racepicks aqua and tol:
25%: Toxic, Radiated, Barren, Desert, Tundra, Ocean
40%: Swamp
60%: Arid
80%: Terran
100%: Gaia
These are the so called environment multipliers. Max pop is calculated by:
(II) max pop = size multiplier * environment multiplier
This value is then rounded.
How do the individual Racepicks affect this value now?
Aquatic
Aquatic simply means that Tundra and Swamp are rated as Terran and for Ocean as well as Terran the whole surface (like Gaia) is habitable.
25%: Toxic, Radiated, Barren, Desert
60%: Arid
80%: Tundra, Swamp
100%: Gaia, Terran, Ocean
Tolerant
This Pick means that you can use 25% of the surface additionally. The only exceptions of this 25% bonus are Terrans, since here only 20% of the surface was unused, as well as Gaias, since the entire surface was already usable on this planets.
50%: Toxic, Radiated, Barren, Desert, Tundra, Ocean
65%: Swamp
85%: Arid
100%: Terran, Gaia
Subterranean
This pick refers - as the name already points out - no longer to the surface. Additional area under the surface is available for the settlement. For each planet a bonus of 2 Pop per size class is added.
An overview:
To: Toxic
R: Radiated
B: Barren
D: Desert
Tu: Tundra
O: Ocean
The last column contains the environment multipliers (adjusted for tol and aqua). The product of 5 * environment multiplier is stated in the next to the last column (Sub-Races get a bonus of 2 to this product).
22.9.05
Growth Formula
Several factors (f.e. housing, racepicks, boom and techs) can influence the growth rate. To demonstrate the growth formula we will analyse these factors step by step:
Basic Growth (b)
Let us first define the following 3 variables:
POPRACE: Pop of the considered race
POPAGG: Aggregated Population of the planet (natives, droids, POPRACE and annexed pop)
POPMAX: Maximum Population of the planet
The Basic Growth (b) is then determined by:
(I) b=trunc{[2000*POPRACE*(POPMAX-POPAGG)/POPMAX]^0.5}
This value b is always rounded down (truncated) before it is multiplied with a 2nd factor (a) which contains five bonuses:
(II) a=1+g+t+r+l+h
Without any further bonus g, t, r, l and h are all zero and the factor a is obviously 1. The summands of this factor are explained in the following:
GrowthPick (g)
-50% growth: g=-0.5
no growthpick: g=0
+50% growth: g=0.5
+100% growth: g=1
TechBonus (t)
microbiotics: t=0.25
universal antidote: t=0.5
RandomBonus (r)
Boom of 100%: r=1
LeaderBonus (l)
For example +30% medicine: l=0.3
Housing (h)
(III) h=PROD/(2.5*POPAGG)
Of course, this just applies when you are housing.
So far, we have explained the product a*b. This value is again truncated. Additionally, we have the cloners which can generate growth:
Cloners (c)
(IV) c=100*(POPRACE/POPAGG)
The growth formula is:
(V) GROWTH=trunc(a*b)+trunc(c)
Last but not least: Starvation - 50k pop are killed per missing food.
Or in detail:
(VI) GROWTH=trunc{(1+g+t+r+l+PROD/(2.5*POPAGG)) * trunc{[2000*POPRACE*(POPMAX-POPAGG)/POPMAX]^0.5}} + trunc{100*(POPRACE/POPAGG)}
What are the implications of these formulas?
(I) Basic Growth:
a) POPmax increases Basic Growth: The pop-multiplier tol, sub and aqua increase Basic Growth slightly.
b) With POPrace=POPagg the derivative supplies the following result:
Half full planets have the maximum basic growth.
b = [2000*POPRACE*(POPMAX-POPRACE)/POPMAX]^0.5 with POPrace=POPagg
db/dPOPrace = (2000-4000POPrace/POPmax)*0.5[2000*POPRACE*(POPMAX-POPRACE)/POPMAX]^(-0.5) and the first factor is zero when 0.5=POPrace/POPmax (half full planet)
c) droids/natives slow down: they just increase POPagg and db/dPOPagg is always negative.
d) When there is more than one race which can grow (i.e. a captured race and not natives or droids) the basic growth numbers are calculated separetely and just the sum is displayed. For an Uni race (without morale penalty) it isoptimal to mix the races.
Equations (II) and (III):
a) Surprisingly, the several bonuses were added. For example: Microbiotics improves the Growth by 50% for a -Growth Race because 0.75/0.5=1.5
b) housing is most important part.
(IV)
a) Cloners are inefficient when there are many droids on the planet.
b) You should not build cloners early on (almost empty) natives planet.
An alternative housing formula
I thought a lot about this topic recently. A few months ago I posted the growth formulas here and I will update this post soon. You see there a lot of variables. In the following just the both key factors (i.e. the Basic Growth b and the Housing Bonus h) are discussed. For simplification let us ignore truncation and let us assume that there are just Worker Units (lets denote them with w) on the planet, i.e. also no droids or natives etc. and therefore we have POPrace = POPagg = w and equation (I) in the above-mentioned blog post simplifies to:
(I) Basic Growth: b = SQRT [ 2000 * w * (POPmax - w) / POPmax ]
Let us clarify: 1 Worker Unit represents 1000k population and when the Basic Growth Rate bgr is mentioned I refer to this ratio:
(II) Basic Growth Rate: bgr = b / ( 1000 * w )
There are now 2 basic results with the current formula:
Half full planets generate the maximum Basic Growth, i.e. w = POPmax / 2 in equation (I).
But we receive the maximum Basic Growth Rate with w = 1 in equation (II).
(Be aware that we haven't considered housing yet.)
When we ignore now further bonuses (like growth picks, boom, microbiotics, leaders or cloners) we receive the total Growth tg by multiplying the Basic Growth b with the factor 1+h, where h represents the Housing Bonus:
(III) Total Growth: tg = (1 + h ) * b
and
(IV) Housing Bonus: h = Production / (2.5 * POPagg)
The Production contains the fixed Production pf (f.e. the 5 production of automated factories) and also the production caused by Worker Units. When we denote the productivity per worker with k and ignore pollution we receive:
(IVa) h = ( pf + k * w ) / (2.5 * POPagg)
Additionally, we assumed POPagg = w and (IVa) simplifies to:
(V) h (w) = (pf / 2.5) * w^(-1) + k / 2.5
Example:
An UniTolInd +1 (without any pollution)
Large abundant Terran: POPmax = 20
Autofacts and RoboMiners means pf = 15 and k = 10.5
so we have:
(I) BasicGrowth: b (w) = SQRT [ 2000 * w * ( 20 - w ) / 20 ]
(V) Housing Bonus: h (w) = 5 * w^(-1) + 4.2
and when we are housing the growth is calculated by:
Total Growth: tg (w) = [1 + 5 * w^(-1) + 4.2 ] * SQRT [ 2000 * w * ( 20 - w ) / 20 ]
Here are the results of our example (click it to enlarge):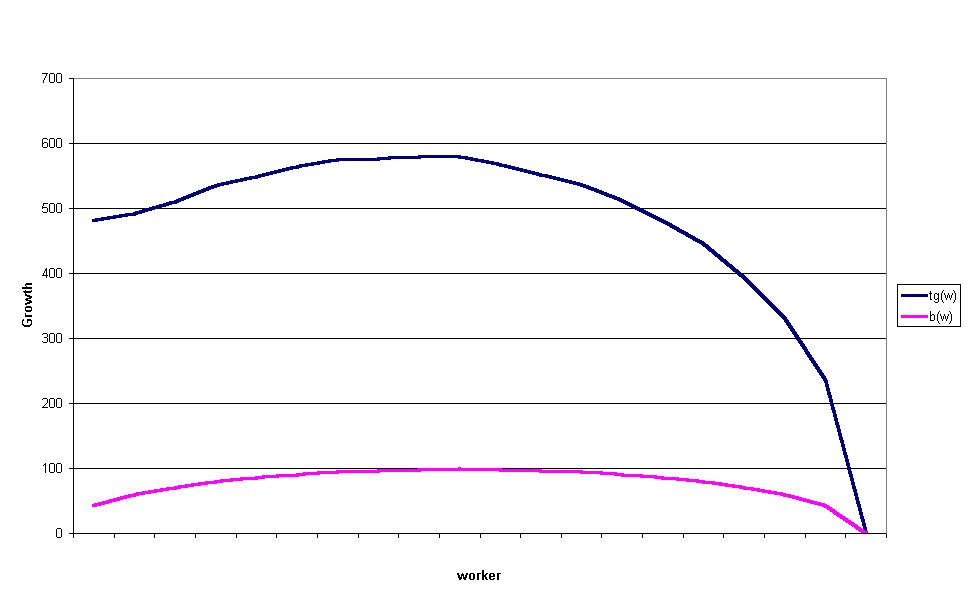
b(w) and tg(w) under the status quo 
Surprisingly, the difference of tg (10) - tg (1) is almost completely explained by the increase in basic growth b (10) - b (1). In fact, the Housing Bonus h decreases with increasing w, i.e. the derivative
h'(w) = -5 * w^(-2)
is always below zero which is the mathematical reason why the slight increase in the Total Growth is driven by the Basic Growth.
This characterizes one part of the problem. When the first pop unit starts with housing the marginal contribution is quite big because of the fixed Production pf which is also used for housing.
So it seems to me necessary to exclude pf from the housing bonus:
(IVb) h = k * w / (2.5 * POPagg)
and again with POPagg = w we have h = k/2.5. One could argue that excluding pf makes economically sense. Improving growth is driven by government policies which are mainly based on subsidies (tax-reductions), services (kindergarten) etc. but not by the industrial complex. Housing itself seems an inapproriate expression - Childbearing (which was proposed by Cybersaber here) seems to fit better.
We receive now following results (click it to enlarge):
Pf removed
The graphs look better, after excluding pf the bonus h is constant now (it doesnt depend on w any longer) and you receive tg(w) by multiplying the basic growth with the factor 5.2. But nevertheless 1pop-housing is still the preferred solution when you decide to use housing:
A good indicator for an efficient housing strategy should be based on the ratio of the pop-increase tg(w) - b(w) = h(w) * b(w) and the invested production units.
We need a further decision when we calculate such ratio. What should happen with the deleted pf? There are several options:
a) This Prod is simply lost.
b) It is transferred to tradegoods (which means that roundabout three quarter of the prod is lost)
c) It is simply stored.
In the following diagram you see how this deleting of pf works compared to the status quo (click it to enlarge):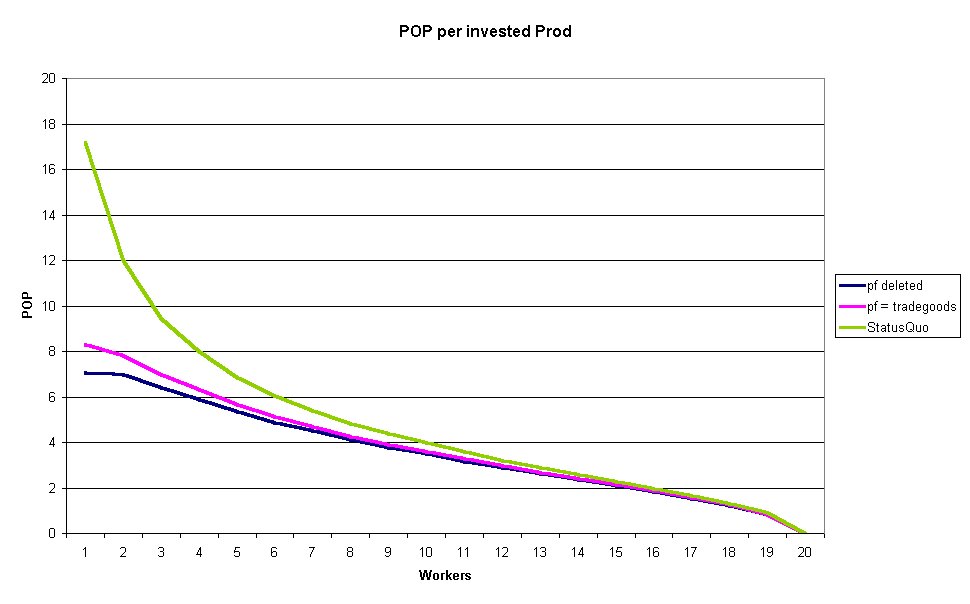
Pop per Prod
Under the status quo 1pop housing is by far the most effective choice. 1prod generates then roundabout 17k pop. When the pf is transferred to tradegoods it decreases to 10k and when we delete this prod just 7.1k pop per prod unit are left (1pop housing). What happens when we store this production? In this case we have the same efficiency as under the status quo.
It is not quite clear which is the approriate ratio here because there is still the alternative of basic growth. We surely have to test this in several games.
Summary: Deleting pf is not enough. We need further steps. A constant bonus h might work when we have a constant basic growth rate for some interval but as pointed out above we receive the maximum basic growth rate with w = 1. (see introduction)
Further Ideas:
We could remove POPagg from the housing bonus since the negative effect of POPagg is already considered in the basic growth function. For example, when we increase the denominator in (IVb) we get:
(IVc) h = k * w / 10
The graph looks now different (click it to enlarge):
Pf and POPagg removed
With an huge amount of prod you are then able to generate more than 1 pop unit per turn. Also the Pop per Prod ratio looks now very different (click it to enlarge):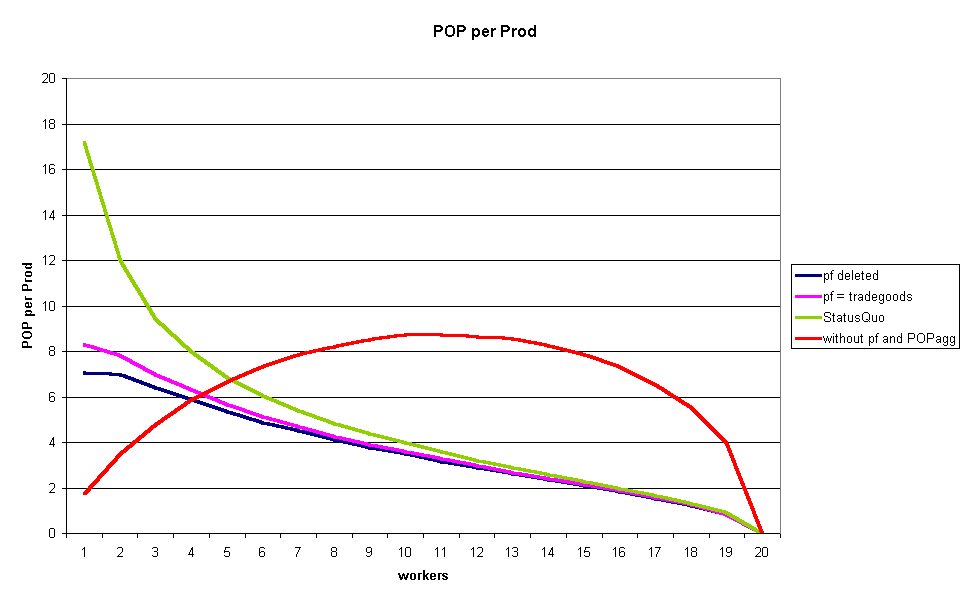
Pop per Prod 2
1pop housing is no longer the most effective choice. Instead of such dominant value we have now a wide range of acceptable housing decisions.
Is the maximum of 8.8k pop per prod a good value? With such a housing bonus we have a completely different game play. It is impossible to say. We need tests. I propose to test such functions with different parameters. (see below)
Does such change improve the AI? Once again. No idea at moment. I know for sure that the AI doesn't use 1pop housing systematically. When it uses housing with more than 1worker under the status quo the AI should be improved.
Further Parameters
Because of the above-mentioned difficulties it would be nice to test different housing and basic growth functions.
Instead of (IVc) I would propose a housing switch /h=a;b which determines the parameters in:
(IVd) h = ( k * w / b )^a
We receive (IVc) with the switch /h=1;10 then.
a should be a value between 0 and 1. (law of diminishing returns)
b should be positive
and instead of (I) a basic growth switch: /b=c;d;e could be useful:
(Ib) Basic Growth: b = 2000^c * {w^d * [(POPmax - w) / POPmax ]^(1-d)}^e
We receive (I) with /b=0.5;0.5;1
In this case the maximum Basic Growth is generated by w = d * POPmax
and the maximum Basic Growth rate: (e * d - 1 ) / ( e - 1 ) * POPmax
Furter, c is a good value to influence the basic growth for 1pop planets.
This should be sufficient to find a good alternative formula.
31.8.05
Corrupted Maps revisited
Recently, I analyzed the subspace comm range issue a bit. Cabman and AlexD pointed out that subspace comm has less range than the manual and online help suggest. I figured out now that this problem is related to the so called "corrupted maps":
The main map is a grid. Let us assume there are two systems with these coordinates:
System A (Xa|Ya)
System B (Xb|Yb)
(Lord Brazen illustrates here the info of the star table. I used mapleveller to read and alter the save game info for the following examples.)
The distance formula d (A, B) of the F9-Parsec-Display is based on the Euclidean distance, this value is divided by 30 and then rounded up:
(I) d (A, B) = round up [ sqrt { (Xa-Xb)^2 + (Ya-Yb)^2 } / 30 ]
(Rounding up makes sense: When the exact value is 4.5 parsecs we just want the info that we need at least 5 parsecs/turn to cover this distance in one turn.)
The same formula d (A, B) is applied to measure the Subspace Comm Range. The manual states:
This upgrade to all your relay stations gives you the ability to issue orders to any friendly ship within 6 parsecs.
Let us assume system A contains a relay station and B reflects the coordinates of the fleet:
d (A, B) = 5 means then that the fleet is in subspace comm range and
d (A, B) = 6 means that the fleet is out of subspace comm range.
With respect to this function d (A, B) there are now two strange results:
1. Why does it happen that a fleet leaving system A with anti-matter drive (and no navi) is out of subspace comm range the next turn?
2. Why does it happen that a fleet with ion drive (and no navi) sometimes just needs one turn to cover a distance of 5parsecs (according to F9-Info on main map)?
Actually, the answer of these both questions is the same: Rounding. The fleets are also attached to (X/Y)-Positions in the save and each turn a rounding occurs to receive a position on the grid. When you move from System A to B the new coordinates of your fleet are calculated by:
(II) (X|Y) = (Xa|Ya) + round up { (Xb-Xa|Yb-Ya) * c }
The factor c is the rounded travel proportion to receive a intersection on the grid:
(III) c = min { 1; parsec per turn * 30 / round down [ sqrt { (Xa-Xb)^2 + (Ya-Yb)^2 } ] }
Combined we receive:
(IV) (X|Y) = (Xa|Ya) + round up { (Xb-Xa|Yb-Ya) * min { 1; parsec per turn * 30 / round down [ sqrt { (Xa-Xb)^2 + (Ya-Yb)^2 } ] } }
A few examples:
System A is (always) at position (505|370) now and a fleet with anti-matter drive (5 parsecs per turn) leaves that system to direction B:
a) System B is at (505|520) and we receive then:
(I) d (A, B) = round up [5] = 5 (is even unrounded exactly 5. System B is exactly below A - same X-Position - and no rounding occurs)
(III) c = 1
and therefore:
(IV) (X|Y) = (505|370) + (0|150) * 1 = (505|520)
The fleet needs 1 turn to move from A to B.
b) Let us change the Y-Position slightly (+1). System B is now at (505|521):
(I) d (A, B) = round up [ 5.03333333] = 6 (6 parsecs is displayed on the main map now - f9)
(III) c = 150/151 = 0.993377
and after 1 turn the fleet is still at:
(IV) (X|Y) = (505|370) + round up [ (0|151) * (150/151) ] = (505|520)
The fleet needs 2 turns to move from A to B.
c) Now same Y-Position like example a) but now a different X-Position (+29). System B is now at (529|520):
(I) d (A, B) = round up [5.06359556] = 6
(III) c = 150/151 = 0.993377
and after 1 turn:
(IV) (X|Y) = (505|370) + round up [ (24|150) * (150/151) ] = (529|520)
The fleet needs just 1 turn to move from A to B. (so called corrupted map because 6 parsecs distance is displayed on main map)
d) Let us change the X-Position a bit further (compared to example c). System B is now at (530|520):
(I) d (A, B) = round up [ 5.06896878] = 6
(III) c = 150/152 = 0.986842
and after 1 turn the fleet is still at:
(IV) (X|Y) = (505|370) + round up [ (25|150) * (150/152) ] = (530|519)
The fleet needs 2 turns to move from A to B.
The SubspaceComm-Issue
Look again at examples b) and d) where the fleet is in hyperspace after the first turn.
In example b) the fleet position (505|520) is exactly 5 parsecs away from system A. And therefore it is in subspace-comm range.
In example d) the euclidean distance is 5.036 parsecs. This value is rounded up to 6 parsecs (see (I)) and the fleet is out of subspace-comm range.
Case b) where no rounding occurs should happen very rarely.
Therefore: A fleet which leaves system A with anti-matter drive (and no navi) is almost always out of subspace comm range the next turn because it is generally a bit faster than 5 parsecs/turn.
Before I figured out the math I thought that the subspace comm issue is just a very late rule change (not mentioned in manual or online help). But it seems now clear that the missing parsec was not intended by the game designers - these rounding issues have been overlooked. Imho it is therefore a bug and should be fixed. There are several options. So far it is only brainstorming, but replacing (IV) with equation (V) looks interesting:
(V) (X|Y) = (Xa|Ya) + round down { (Xb-Xa|Yb-Ya) * min { 1; parsec per turn * 30 / round up [ sqrt { (Xa-Xb)^2 + (Ya-Yb)^2 } ] } }
With this change subspacecomm would work correctly. Also the corrupted maps issue would be affected by this change. It is no longer possible to be faster than expected but slower. (Probably an advantage for the defenders.)
12.8.05
Combat Speed
There is some interesting discussion on LBs forum about the so called battlepods "bug":
To illustrate dirt-bag's proposal look at the combat speed table (click it to enlarge):
Combat Speed
These are the EXE-values dirt-bag refers to. You see that the difference between minimum and maximum speed - the maximal unused space speed bonus - is always 10. This table does not include the battlepods effect or augmented engines. Some examples how this bonus works:
I. Status quo
a) destroyer - nuclear drive
the destroyer has 60 space avaiable which we will define as hull size.![]()
DD nuclear drive
So we have:
(I) combat speed = minimum combat speed + unused space bonus
and
(II) unused space bonus = round up [10 * ( unused space / hull size )]
combined
(III) combat speed = minimum combat speed + round up [10 * ( unused space / hull size )]
b) destroyer - nuclear drive - megafluxers
Before we look at the battlepods issue let us see how megafluxers work. Them maximum unused space is now 75. The space increase is abbreviated with dM and it is added to the hull size in (II) and (III). So we have now:
(IV) combat speed = minimum combat speed + round up [10 * ( ( unused space ) / ( hull size + dM) )]![]()
DD megafluxers nuclear drive
Results:
Maximum combat speed is unchanged. (sounds logical)
Minimum combat speed is unchanged. (counterintuitive)
A DD (which has before and after researching megafluxers the same space consumption) has on average a speed increase of 1.05. (Values vary from 0-2)
c) destroyer - nuclear drive - battlepods
Let us now analyze the battlepods (without megafluxers).![]()
DD battlepods nuclear drive
For the first 60 unused space units the equation (II) and the table under b) destroyer - nuclear drive - megafluxers were applied. When there is even more unused space the battlepods bonus comes into play again:
(V) battlepods bonus = round down [10 * dB / hull size ] * round down [ (unused space-60) / dB ]
Results:
Maximum combat speed increases beyond 18. (extremely counterintuitive. That is the main problem we want to solve here.)
Minimum combat speed is unchanged. (counterintuitive)
A DD (same space consumption) has on average a speed increase of 4.59 caused by battlepods. (Values vary between 4-5)
d) destroyer - nuclear drive - battlepods + megafluxers
The results are now a bit incosistent. You cant describe them by "more space=more speed" any longer.![]()
DD battlepods & megafluxers nuclear drive
For the first 75 unused space units the equation (IV) and the table under b) destroyer - nuclear drive - megafluxers were applied. When there is even more unused space a further battlepods bonus comes into play:
(VI) battlepods bonus = round down [10 * dB / ( hull size + dM ) ] * round down [ (unused space-75) / dB ]
The megafluxers increase dM is added to the hull size. Therefore some empty battlepods ships even slow down when you research megafluxers.
The maximum combat speed (22) is lower here than under c). (inconsistent)
II. Megafluxers solution for Battlepods
One idea to solve the problem seems straightforward to me. Battlepods should influence the combat speed like megafluxers. Equation (V) is then replaced by
(VII) combat speed = minimum combat speed + round up [10 * ( ( unused space ) / ( hull size + dB ) )]
and instead of (VI) following equation is used:
(VIII) combat speed = minimum combat speed + round up [10 * ( ( unused space ) / ( hull size + dB + dM ) )]
Battlepods-"bug" removed
Results:
Maximum combat speed stays at 18. (sounds now logical)
Minimum combat speed is unchanged. (still counterintuitive)
A DD (same space consumption) has on average a speed increase of 1.69 caused by battlepods. (Values vary between 0-4)
III. Reducing unused space bonus
Another idea is quite easy to realize and it is one of dirt-bag's preferred solutions. Simply reducing the maximal unused space speed bonus. So far, it was always 10 in the above-mentioned examples. With a maximum of 2 we receive following results (click it to enlarge):
Reduced Unused Space Bonus
Results:
Maximum combat speed stays almost at 10. (battlepods-bug almost completely resolved)
Minimum combat speed is unchanged. (still counterintuitive)
A DD (same space consumption) has on average a speed increase of 0.52 caused by battlepods. (Values vary between 0-1)
Other values than 2 are also an option (especially when combined with Solution II.). A switch which determines the unused space bonus would be a nice option to test different values.
IV. Space Consumption Model
a) Introduction
So far we had formulas which were based on unused space. Such formulas work fine as long as hull size is constant. But with space increases (like megafluxers or battlepods) we had a lot of fuzzy results. As long as unused space is our key variable there is no workaround to solve all the different problems at the same time. But there is a simple space consumption model with imo convincing results. Replace equation (I), (II) and (III) with:
(IX) combat speed = maximum combat speed - space consumption malus
and
(X) space consumption malus = round down [(10/1.5) * ( consumed space / hull size )]
combined
(XI) combat speed = maximum combat speed - round down [(10/1.5) * ( consumed space / hull size )]
The denominator 1.5 achieves that a full battlepod ship will have the same speed as under the status quo. The value reflects the battlepod increase (HS+dB)/HS. This value 1.5 works for dd-doomstar, for a ff the exact value 37/25 should be used.
No further formula is needed. Battlepods or megafluxers don't change the formula - they just increase the potential to consume more space. Therefore we need just one table to display all results (incl. battlepods, megafluxers or battlepods+megafluxers):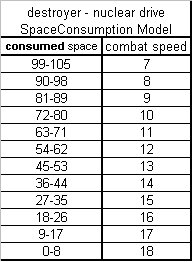
Space Consumption Model
Results:
a) an empty destroyer has always combat speed 18. (convincing.)
b) a full destroyer (without bp or m) is now a bit faster than under the status quo (combat speed 12).
c) a full destroyer with battlepods has still the status quo-speed. (8)
d) a full bp-destroyer is therefore slower than a full non-bp-destroyer. (convincing)
e) A DD (same space consumption) has never a speed increase caused by battlepods or megafluxers. (convincing, or at least no completely unconvincing speed changes)
Compare the last point with the megafluxers effect under the status quo: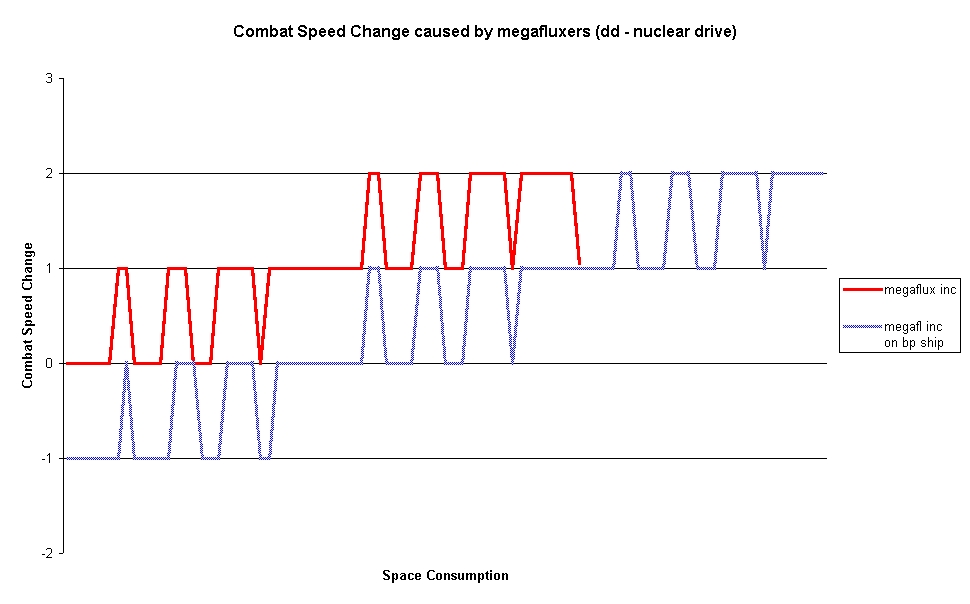
megafluxers speed change
Let us assume we have same design and just add megafluxers:
For a non-bp ship see the red graph. (Space consumption 0-60)
BP ship the blue graph. (Space consumption 0-90) There is even the above mentioned speed decrease.
The speed decrease will be eliminated in a pure megafluxers solution (solution II) but results similar to the red graph will persist. And IMO there is no convincing explanation for such behaviour. IMO solutions based on space consumption models (solution IV) should be the way to go.
b) Implementing a battlepods malus
I propose to implement the bp-extra malus (dirt bag's idea here) in the following way:
Just change the factor (10/1.5) to 9/1.5=6
(Once again, for a ff the exact value 37/25 should be used.)
So instead of (XI) we have:
(XII) combat speed = maximum combat speed - round down [6 * ( consumed space / hull size )] and -1 when bps are used.
SC Model with BP-Malus
61-75 depends on battlepods.
0-60 using battlepods is inefficient.
76-105 using them is necessary.
Adding BPs and consuming the extra space is always a loss of 4 combatspeed and -20 beamdefence then.
c) Implementing an unused space bonus reduction
Dirt-bag's observation is correct that this new model doesn't solve the runner-problem completely. But there is a simple way to implement such idea (solution III), which just reduces the maximum combat speed (and not the speed of a full battlepod ship):
(XIII) combat speed = maximum combat speed - C - round down [(9-C)/1.5 * ( consumed space / hull size )] and -1 when bps are used.
(Once again, for a ff the exact value 37/25 should be used.)
The best example to illustrate the runner problem is IMHO a ff on iondrive level. In the following table (click it to enlarge) you see the results for different C-Values (0-9):
SpeedDecreaseSCModel
In the red row at top you see the maximum speed decrease. The lower red row shows that the speed for a full bp-ff is unchanged. The beige row is important for aug eng ffs. (aug eng consumes 10 space). Just add 5 combat speed to this row and you receive the combat speed of these runners.
According to dirt-bag a runner with 22 combat speed is unable to outrun a fast nuke (on iondrive-lvl 18 speed). The C-Value of 7 should be his preferred solution then.
27.7.05
Master of Orion II - Bugs
1.31 and 1.4
This overview contains following sources: Lord Brazen's faq, 4381's bugs list, Gontzol's faq, the old Mooniac's Guide, antaren newsgroup, several moo2 boards and some further bugs, which were observed recently. I have verified almost all of these bugs. Exceptions are the bugs with the "reported by" comment. When you are aware of further bugs you can add them here under comments or in this thread. I will try to update this post.
Fixed in 1.4
Arti If you discover a system with artifacts you will loose the artifact bonus on the planet if you are not the 1st player to Turn. However you will still keep the technology discovered.
Blackhole Generator Doesn't work with ship initiative. It just immobilizes ships. Fixed in 1.4b23
Colony/Outpost Ship It is possible to land a Colony Ship or Outpost ship and still have it intacted the next turn.
Credit cheat If you have nothing in your build queue the excess production will be counted twice. You will get the extra BCs and the production is still stored
Last race LAN games crash when a player presses the Last Race button. Also, it is possible to pick the same race picture as an opponent in multiplayer games.
Leaders The game crashes when you go to view you ship leaders and you have no ships.
No Orion bug The noorion switch can cause crashes on FLEETS and LEADERS screen. Fixed in 1.4b20
Phasing Cloak (battle) Only one side decloacks after 10 turns in a MP-battle.
Repeat build It is possible to cancel the production of a repeat build item after it has been bought. This allows money to be converted to stored production. It can be exploited to purchase expensive items by cancelling multiple cheaper repeat built items over the course of several turns. Fixed since 1.4b19
Stealth field, Cloaking Device and Phasing Cloak (main map) Ships equiped with these technologies are still visable on the galaxy map by your opponents. They are visable at the same range as regular ships.
Tractor Beams There is often a crash to desktop for one of the both players, when:
a) A ship with activated tractors moves.
b) An "immobile" opponent ship moves.
Gusset's hypothesis seems to be true: "If I get to move a tractored ship, and the ship armed with the TB is OFF-SCREEN when I am moving, the result is a crash." So in both cases (a and b) OFF-SCREEN tractor beam is the cause of the crash. Fixed in 1.4b23
SERIOUS BUGS (exploitable or without workaround)
Annihilation Under certain circumstances, annihilation can result in a planet with zero population. It is impossible to invade or bomb. Also, if an invader remains in orbit of this system it can prevent the invader from entering combat at other systems as well. This can be exploited to create a permanent outpost. Probably fixed in 1.4b22
Don't annihilate the whole pop. Click at the red sentence at the top of the colony screen to stop the annihilation when there is just 1 pop on the planet.
Arti When two players get an arti on same turn one doesn't get the special. reported by dirt-bag
Double Monsters Sometimes after you kill a monster it will return the next turn and you will have to kill it again.
Engage Battle & Settle Cship/OP -Pop up Sometimes it causes crashes to desktop. (Especially in the end game.)
Feudal bug MP-Opponents can receive the feudal ship bonus.
Fuel Cells, Warp Int Sometimes Fuel Cells and Warp Ints won't work (immediately) after stealing them (spying, invasion). You have to build a new colony or outpost in an uncolonized system to get the fuel cells update. (Warp Int fix unknown.)
Leaders Gizmo, Cyr, Draxx (?) etc. don't work properly. Gizmo and Cyr reported by Sky Bandit, Draxx reported by Mooniac-Guide
Navigator not working Travel distance is not calculated correctly if there is a nearby wormhole and your ships are not located at one of your own systems. You will have to return to your own system and then travel from there. reported by Lord Brazen
Navigator (Retreat) Retreating from combat can result in loss of your entire fleet if there is a wormhole in the retreat path even if you have a navigator. reported by Lord Brazen
No Outpost While Colony Ship Present Bug See also the "Not asked to land colony ship after choosing not to land outpost" bug mentioned by LB. This bug here occurs on pure asteroids/gas giant systems. Sadly, in this case there is no comfortable workaround. The Cship has to leave the system.
Optronics Computer Does not appear in the demand/offer or tech exchange list. Network Multiplayer only. Since tech exchange is generally banned this is just an issue for 2vs2.
Outposts (strategical combat) It is impossible to defend outposts. Even when the opponent lost the battle the outpost is always destroyed.
Phasing Cloak (battle) Using a Time Warp Facilitator, you can re-cloak in the same turn you de-cloaked, so the main limitation of cloaking devices / phase cloaks gets disabled.
Ship Capture When you capture several ships the battle can freeze. Similar lock up also occurs because of excessive use of stasis fields. So far, I observed this only against AI opponent. (Probably, autocombat issue.) Nevertheless, there are battles against Ais in xWays.
Soils (also with Autofacts/Rlabs) In the round that you produce a building which creates a food production bonus, moving workers can result in the bonus being lost temporarily or a game crash. (This can also happen with autofacts and rlabs.) Doubleclick corn cobs (planet surface screen). Then move farmers again (in the table under COLONIES). Crashes reported by Lord Brazen
Travel distance Even without navigators the travel distance is sometimes inaccurate, f.e. you need just 2 turns with ion drive for a 9 parsecs distance. (Corrupted Maps.)
MINOR BUGS (comfortable workaround and/or exploits are easy detectable)
Androids Under certain circumstances it is possible that androids generate extra space on a planet. Note, that this extra space is not related to their tolerant feature!
Antares A Network-Game (not hotseat) doesn't finish after you won the battle at antares.
Autobuild Exploits similar to the credit cheat are possible. As long as this is unfixed autobuild should be banned.
Auto Factory This is whereby when scrapping a building from the Colony Screen, as soon as the mouse is moved over the building icon the game will crash. 90% of the time it is scrapping the Auto Factory that causes the crash. Do not scrap the Auto Factory. Avoid this screen.
Converted Lithovores When you are lithovoric and research Evolutionary Mutation, you can drop the "lithovoric". All you do is turn cybernetic on and off when you get to the race screen - then you have 14 new race picks to spend.
Display Bugs Several display bugs can appear. For example: System info when there is more than one colony ship present. The food per farmer entry in the planet info is generally incorrect for a race with food malus.
Intermittent Crashing Sometimes at the end of turn in Multi-Player the game will crash. Try running without sound. Run Setsound.exe and set Midi and Digital to "None". If the problem goes away then there is an issue with the sound driver / card. An AC97 sound based card is know to work well with Moo2. reported by 4381
Not asked to land colony ship after choosing not to land outpost When you choose not to land an outpost ship you will not be given the option to land your colony ship when present. You must select Colonize Planet manually after you cancel.
Orion Sometimes you gain some further non-xenon tech by defeating the guardian. It is not listed in the pop up.
Overpopulation Under certain circumstances, it is possible to overpopulate a planet with androids or captured races. This can be exploited to create a super planet.
Phantom missiles Sometimes there are missile stacks with a quantity of zero. This stack will proceed to target but cannot be shot down. It seems to do no damage.
Retreat from battle field Retreating from a battle can result in a game crash. It seems to only occur in LAN games when you retreat from the left edge of the combat area.
Shield Generator When your ship's shield generator is destroyed, and you're capable of repairing your ship, if your ship survives several next turns, the generator (as other items like comp or drive) will be repaired. But the repaired shield works incorrectly: it still blocks damage (e.g. class 5 blocks 5 damage from each attack), but it has no strength and it does not recharge.
SubspaceComm-range is due to rounding errors just 5 parsecs (the Online help states 6 parsecs). The fleet which leaves the starbase with 5 parsecs/turn is almost always out of subspacecomm-range. Details here.
Transport colonists+change profession bug When transporting colonists to a different job field on a different colony, the game checks the maximum of workers for the source planet, not for the target planet.
INACCURATE ONLINE HELP
Alien Management Center The Alien Management Center (AMC) removes the -20% morale penalty on multi-racial colonies. The Online Help does not mention that. Instead it states that the AMC assimilated aliens twice as fast and made them "work harder". This is not true. The manual is accurate: "This facility assimilates conquered populations at the rate of 1 per 2 turns, regardless of government. The adjustment for a Charismatic or Repulsive race is applied to this base rate."
Anti-Missile Rockets Contrary to the description, the chance to shoot down a missile is approximately 60% - 1% per square traveled.
Augmented Engines and BeamDefense Augmented Engines add +50 BD to the listed BD in the ship design screen, but only +25 BD is listed on the main map and in battle.
Beam Defense Racial Bonus For BD racial bonuses, the same value is also added to Missile Evasion. The listed value on the main map only uses half of this Missile Evasion bonus, but the full bonus (listed in battle) applies.
Fighters The Online Help does not provide or gives wrong information about the speed of fighters, which is 6 + 2x drive level for Interceptors, 2 + 2x drive level for Shuttles and 4 + 2x drive level for Bombers and Heavy Fighters. Basis hitpoints for interceptors (2) and bombers (4) are missing. Fighters' hitpoints are multiplied by your best armor, the same as for ships. The reduced armor bonus (mentioned under armor in the online help) for fighters does not exist.
Inertial Nullifier The Inertial Nullifier also adds +50 to missile evasion.
Inertial Stabilizer The Inertial Stabilizer also adds +25 to missile evasion.
Missiles The Online Help does not give any information about the speed of Missiles (which is 8 + 2x the empire's drive level). BTW also the manual is misleading: Missiles do not profit from better Armor technologies. Even with Xentronium, a Nuclear Missile can only take 4 points of damage, a Merculite 8, a Pulson 12, a Zeon 16.
No Instant Assimilation Bug You have to assimilate feudal colonists.
Psionics Psionics provides a +10% morale bonus on all planets under Feudal, Dictatorship, Confederation and Imperium governments. The Online Help states that the bonus only applied to Dictatorship and Imperium.
Scout Lab Bonus Bug Against monsters and when Defending against Antarans it provides always +20 beam attack, not +10 per ship size class as stated in the manual. And no Bonus during Battle at Antares.
Ship Crew Level The ship crew level (green, regular etc.) doesn't affect the ground combat value for raiding/boarding as it is mentioned in the manual.
Space Academies The Online Help states that Space Academies add +2 experience points per turn for every friendly ship in the system. In fact the number is +1 (and a further +1 is even added without academies). Also, the experience-points-per-turn-bonus (but not the starting level bonus) of Space Academies is cumulative: if you have a ship in a system with 4 Academies, this ship will get +4 experience points every turn. Since this is explained nowhere, I do not know whether this is a bug or just missing Information.
Spatial Compressor Damage ranges from 4 to 32 as listed, but is NOT increased by the target ship's size class.
Spies The 1 BC maintenance cost per spy is not mentioned. (Building Screen)
Spy Bonus/Penalty The Online Help states about the spy racepicks: "All offensive spies sent on mission will receive the full bonus/penalty, while defensive spies receive one-half the amount." This seems incorrect. The whole bonus/penalty is listed in the RACES screen.
Star Fortresses The Online Help states that Star Fortresses add +20% to offense and Defense of all friendly ships in combat. In fact this bonus applies to beam offense only. (or at least there is no *listed* beam defense bonus in battle)
Tolerant The Online help states that tolerant races treat all planet environments as Terran for purposes of maximum population. This is not correct. The correct max pop values are explained in the manual: "Races that are tolerant can use 25% more of a planet's surface for habitation, living in places no other race would dare and boosting the planet's maximum potential population. Thus, for example, while a typical race could live on 25% of a Barren planet, a Tolerant race could use 50% of the same planet."
(Just a 20% surplus for terrans -80% is already habitable - and no surplus for gaias.)
Torpedos The description for anti-matter torpedos lists an incorrect speed of
20; anti-matter torpedoes have a speed of 18.
And also Plasma Torpedos have a speed of 22 (instead of 24).
BUG OR FEATURE?
Android Morale Bug Android workers get morale bonus contrary to what is said in the manual or online help.
Battle Pods "Bug" Ships are faster when there is more unused space on them. This Unused space speed bonus is apparently calculated by the formula Bonus = (10 * ( unused space / hull size ) ) for every ship. The hull size in the formula is the base hull size of ships of that size class in the empire. By equipping your ship with battle pods, even a further speed increase is possible (details here under I.c) ). Be aware that megafluxers are treated differently than battlepods. This means that there is no DIRECT speed increase caused by "just adding" megafluxers on an empty ship. The intention of the game designers is unclear but I see no convincing reason for this difference (maybe there is a inactive battlepods malus) - (i.e. bug). See also here.
Beam Offense "Bug" When a Star Base is present, there is no bonus, but when there is a colony or outpost present that has no orbital base, the bonus is +10 BA.
Freighters Building a freighter generates an income of 5 BC.
5.3.05
Master of Orion II Strategy Guide
by Cybersaber
Purpose
Most players who start to play MOO II online have a lot of experience playing against the computer, but very little experience playing against other human players. There is a steep learning curve when playing against human players, and many of the lessons that good players have learned offline have to be thrown away when playing against humans. This guide is designed to help players quickly get over this obstacle and start to enjoy their online games.
Applicability
The strategies, tactics and techniques explained in this guide apply to the types of games usually played online against human opponents. Most online games are set up for medium or large universes, at the Pre-Warp or Average Technology setting, utilizing Tactical Combat, no computer managed empires (AIs), and no Antarans. Some parts of this guide are irrelevant for strategic combat games, and only loosely relevant for small universes or Advanced Tech games. Some parts of this guide do not apply when playing the DemoDict Mod.
Race Picks
One of the real joys of this game is the wide latitude to experiment with a huge variety of race combinations. While this is a great deal of fun, the Darwinian struggle of years of combat has proven that there are certain requirements for a competitive race. These include:
Population Capacity Modifier. Population is the ultimate arbiter of victory in MOO. A race without the ability to generate a large population will almost always lose the population competition, and shortly thereafter the game. It is essential that your race picks include at least one of the following pop capacity modifiers: Aquatic, Subterranean, Tolerant. Each of these picks increases the number of colonists that a planet can hold. Lithovore is also a viable pick: it does not increase the number of colonists a planet can hold, but by eliminating farmers, it does give you more usable population.
Government. Unification is the preferred form of government, and essential for any production oriented race. Democracy is also a viable pick, though generally a much tougher race to play. With a very few exceptions, Dictatorship and Feudal governments are suicide unless a player intends to jump an opponent very early on and gets lucky enough to find a convenient Worm Hole right to them. In theory, there is a fair balance between Production Races (Unified) and Tech Races (Democratic). In practice, Production Races rule. This is because Production Races can routinely out-colonize and out-populate Tech Races, which means they can ultimately even out-tech a Tech Race. It is also worth noting that a Production Race will settle a lot more planets, which means it can usually produce most of its research through its buildings, not its population, while a Tech Race, with many fewer settled planets, has to rely on its smaller population for most of its research, which hinders expansion and fleet construction.
Creative. Many new players start online with a strong affinity for Creative races. They quickly learn that a Creative race sacrifices so many other picks to be Creative that it cannot compete with Production Races, and usually not even with Tech Races. Creative can be a viable pick in the hands of a veteran player, but it is universally regarded as suicide for a novice online player. Avoid this pick until you have mastered winning with a Production Race.
Negative Picks. It is routine to select between 9 and 10 points of negative race picks in order to be able to choose between 19 and 20 points of Positive Picks. Since most online games do not include AI empires, Repulsive is the standard negative pick. It counts for -6 picks, but results only in a poorer selection of leaders, which makes this easily the best pick for the money. The remaining 3-4 negative picks are either -10 Espionage (DON'T pick this if you are democratic) or the combination of -10 Ground and -20 Ship Defense. DO NOT pick -20 Ship Offense. This is both a severe handicap to your beam weapons and, under the algorithm for Ship Initiative, will usually lead to your ships moving and firing second, which is a horrible handicap.
As a guide to new players, let me suggest a few good races to start with:
Production Race #1: Unified, Aquatic, Large Home, Rich Home, Production +2, Repulsive, -10 Ground, -20 Ship Defense. Comments: This is a very powerful race, but it is a little dependent upon good luck in finding wet planets, without which its population capacity will suffer. Its biggest advantage over Production Race #2 is its ability to pick Clones and rapidly grow its population.
Production Race #2: Unified, Tolerant, Large Home, Production +1, Repulsive, -10 Ground, -20 Ship Defense. Comments: This is a very stable race, and quite resistant to bad starts and poor quality planets. It is key with this race to get Soil Enrichment right after Research labs and Auto Factories. If this race finds a rich or UR planet for its first colony ship, it will do extremely well.
Balanced Race #1: Unified, Aquatic, Large Home, Rich Home, Production +1, Science +1, Repulsive, -10 Ground, -20 Ship Defense. Comments: This race can build well and tech well. It is an excellent race for launching an early attack on an opponent.
Tech Race #1: Democratic, Lithovore, Artifacts Home, Repulsive, -10 Ground, -20 Ship Defense. Comments: This race generates more early research than any other. Its Achilles Heel is the lack of any population capacity modifier. Taking an early monster is essential in order to secure a deep planet to store a lot of population. This race also does quite well if it can get Terraforming or Androids in the mid-game.
Tech Race #2: Dictatorship, Lithovore, Subterranean, Artifacts Home, Large Home, Repulsive, -10 Ground, -20 Ship Defense. This race techs very well and can also build up a large population. It is, however, quite weak at early production and expansion. It should research Cloning Centers right after Auto Factories to maximize population growth.
Tech Race #3: Democratic, Aquatic, +1 BC, Repulsive, -10 Ground, -20 Ship Defense. This is a fascinating race. The combination of Democracy (50% BC bonus) and +1 BCs per colonist generates enough BCs to be able to buy most of this race's production items when they are only half built (the most efficient time for purchase). You really want to focus on population growth to maximize this benefit, since the +1 BCs are generated per colonist.
The Opening Sequence, Average Technology Universes
Here are some general rules for your opening moves in an Average Technology universe.
All Races. Set your research option to research labs. Redesign your two frigates to eliminate the laser weapon, keeping only the Extended Fuel Cells (this maximizes the chance that your scouts will survive an encounter with a monster), and refit your scouts as the first two items in your production queue. Then add to the production queue your first colony base, a freighter (to ship food to the newly created colony), and then as many remaining colony bases as you can build. Finally add in a colony ship to store any unused production at the end of the queue. You may also want to consider scrapping your marine bases (unless you are Dictatorship), to cut your BC maintenance by 1 BC a turn and to get an extra 30BCs from the scrap. These extra BCs can then be used to buy your first colony base before it is finished.
Production Races. Move all population not needed to keep your food production balance positive into production, leaving none on research. Keep all available population on your home planet on production until the last colony base is built, then move all but one worker on the home planet into science to start researching Research Labs. Use the Housing Technique (see below) to maximize population generation on your newly built colonies, moving the newly created colonist back to the home planet to help building the next colony base.
Tech Races. Keep only one or two colonists on production, and move all remaining colonists not needed for farming into research. Keep them on research until you have gotten Research Labs (build or buy as soon as you get it), and then move on to Reinforced Hull and Auto Factories. Once the Auto Factory is built, then move all population into production and keep them there until you have built your last colony base in the home system.
Once all colony bases in the home system have been built and Labs and Auto Factories researched and installed, it is time to start building outposts and colony ships to start expanding your empire.
Technology Paths
The specific technology path to follow varies by player preference, race picks and player strategy (early attack versus long development, for instance). Nevertheless, there is a basic technology path that applies to most situations and races.
For an Average Tech Game, the optimum path is usually as follows, in order:
1. Research Labs
2. Reinforced Hull
3. Auto Factories
4. Biospheres
5. Soil or Clones (take Soil if your race produces 3 or less food points per farmer, otherwise take Clones)
6. Neural Scanners
7. Super Computers
8. Battle Pods
9. Spaceports
10. Robo Miners
Past this point, it is usually best to get all remaining tech worth 250 Research Points (RPs) or less, before continuing on to Zortium Armor.
The Opening Sequence, Pre-Warp Technology Universes
The opening sequence for Pre-Warp Technology games is broadly similar to Average Technology games with a few extra technologies to research. Again, Production Races should research Freighters and then build all of their home system Colony Bases before beginning any further research (unless you are Lithovore, you will need freighters to feed those new colonies). Tech Races should research to Auto Factories and only then start to build their Colony Bases. Tech Races are at a severe disadvantage relative to Production Races in Pre-warp games, since the lack of a starting Colony Ship puts a real premium on production capabilities.
For a Pre-Warp game, the optimum Technology path is usually:
1. Freighters (skip this if you are not a Production Race)
2. Electronic Computer
3. Research Labs
4. Reinforced Hull
5. Auto Factories
6. Freighters (if you did not research them in Step 1)
7. Extended Fuel Tanks
8. Biospheres
9. Soil or Clones (take Soil if your race produces 3 or less food points per farmer, otherwise take Clones)
10. Neural Scanners
11. Super Computers
12. Battle Pods
13. Spaceports
14. Robo Miners
Past this point, it is usually best to get all remaining tech worth 250 Research Points (RPs) or less, before continuing on to Zortium Armor.
Technology Research Tradeoffs
There are several interest research tradeoffs that are worth commenting on. The first concerns the Chemistry path. New players are often tempted to select Tritanium Armor, Pollution Control, Irridium and then Zortium. This is a sharply suboptimal path for two reasons. The first is that it leaves you without a decent missile, a handicap at best, and potentially fatal if you run into a Creative player (Radiation Shields are immune to most beam weapons and completely immune to nuclear missiles). Moreover, Merculite missiles are extremely nasty weapons when you can Mirv them at the Zortium level. The second reason is that Atmospheric Renewers eliminate TWICE as much pollution as Pollution Controllers. Accordingly, the tech path that I recommend up the Chemistry Track is Dueterium Fuel Cells (for range), Merculite missiles, Atmospheric Renewers and then Zortium. The risk is that you have no decent armor for your ships for a LONG time. You are not safe until you have reached Zortium. But if you can get there, your empire and your ships will all be much deadlier than an opponent's who has chosen any other combination (the one MAJOR exception is a Tolerant race, whose optimum path is Tritanium Armor for early advantage, Merculite missiles, Irridium Cells and then Zortium).
Another interesting tradeoff is between Class III shields and Warp Dissipators. Generally, Warp Dissipators are the better choice, because they ensure the complete destruction of an enemy fleet if you can win the battle. Warps are particularly nasty when used in combination with EMG missiles, because even a single EMG missile hit can eliminate a battleship and warps prevent the target for retreating from the strike. Class III is an excellent choice if you are facing a Creative race (it negates his deadly Ion Cannons), but should otherwise be chosen only if you are the underdog and need the extra edge to defend.
Many new players choose Hydrofarms over Biospheres. This is a bad tradeoff. The extra two farmers afforded by biospheres should be good for at least 4 extra food points above what they themselves eat, which is the equivalent of two Hydrofarms. Moreover, these colonists earn a BC each turn, whereas each Hydrofarm eats 2BCs each turn.
Perhaps the toughest choice in the game is between Auto Labs and Cybertronic Computers. There is no right answer here. However, as a general rule, the player who picks Auto Labs will pull away from his opponent rapidly in technology, while the player who picks Cybertronics will enjoy a huge but rapidly declining combat advantage. Production Races can make enough ships to launch a nasty fleet during the window of advantage for Cybertronics. Tech Races generally cannot, but they may also be generating sufficient RPs to be able to compete in technology without Autolabs. So take Cybertronic if you can launch a large fleet shortly after getting it, or if you can compete in tech even if your opponent gets Auto Labs and you do not. Otherwise, take Auto Labs.
Housing Technique
If population is the key to victory in MOO, then the Housing Technique is the key to rapid population growth. The technique is to put just a single colonist on a planet to building Housing, with no other colonists present. This maximizes the production of population. When a second colonist is created, immediately ship it off planet to keep the housing planet at maximum production. The idea is to use your smaller planets as population factories, and ship the population they generate to your larger planets where it will do the actual work of your empire. If you can keep roughly 1/3 of your planets on housing like this, you can easily double the rate at which your population expands. The only exception to this technique is the case where you pick Population +50% or +100% as race picks. In this case, while the housing technique still works, the optimum population growth rate for planets not on housing occurs when they are 50% full, so your pop will grow almost as fast with no planets on housing if you can keep expanding your settlements fast enough to maintain the average planet at 50% population.
Empire Expansion
Obviously you want to expand your empire as much as possible. Less obviously, you need to stop at some point and concentrate on defending what you have, or better yet, taking what the other guy has from him. When do you reach that point? The answer depends on the races involved, the strategies employed, and the size of the universe you are playing in.
In a medium universe, it is generally a good idea to stop after constructing just one or two colony ships, and it is not hard to win without building any at all. In a large universe, building at least two or three is a good idea. Building more that five or six, however, begins to ask for trouble, and building ten or more is begging someone to come along and start taking them from you. In a medium universe, you should expect at least one enemy Battleship to attack you by turn 90 (turn 80 given a convenient wormhole). This means that you need to have your own Battleship, or suitable defenses, in place by that turn.
In a large universe, given the extra distance, you should expect at least one enemy Battleship to attack you by turn 110 (turn 80 given a convenient wormhole). You can often be hit by three or more battleships by turn 120. You can take risks, but if you do not have a fleet in being by these turns, you have probably over expanded.
Buildings
It is generally a good idea to build every building you can on every planet you have. There are exceptions. Biospheres cost a BC every turn, so don't build them until a planet is almost full. Spaceports cost 1 BC a turn, so they make no economic sense on planets of less than 4 pop. Don't build a Pollution Control center or Atmospheric Renewer on a planet that is 100% dedicated to farming. If you get clones, do build them on every planet: they will add a flat 1/10 of a colonist per turn, no matter what kind of planet you put them on.
Research
Naturally, you want as much research as you can get, consistent with being able to build what you have researched. Players naturally think of their scientists as the engine of research. This is not necessarily correct. Actually, it is quite possible for a Production Race to construct a winning empire with virtually no colonists on science after the discovery of Auto Factories. This is because buildings (Research Labs, Super Computers, Auto Labs and Galactic Cybernets) can also be the engines of science. A Production Race can generate all of its research by settling a large number of planets and making sure every one has all available science buildings in place. From this perspective, EVERY planet is a good planet, because even the humblest tiny ultra poor low gravity planet can host the same number of science buildings as a huge ultra rich gaia.
Production
There are a few subtleties to production, most of which revolve around pollution. The first is that within any one planet, it is better to have just a few workers on production over a long period of time that to whipsaw between everyone and no one on production. The first worker on production generates very little pollution, the last generates a ton, and so is not nearly as productive. Accordingly, keep 2-3 colonists on each planet on production at all times, and when there is nothing in particular that you are itching to build, use a colony ship, starbase, or battleship as the first build item solely as a store of production. When you are able to construct a new building, insert it in the build queue ahead of the item storing your production, and it will likely be built immediately. In this manner, your overall population will be most productive.
A second key point is that small planets generate more pollution per worker than large ones. So use your large planets for production, and your smaller ones for housing, farming or science.
A final point is how to use BCs to buy construction items. If you run the math on time versus money, your BCs buy the most production when you purchase an item that is 50% built. So try to time your key purchases for this point in the item's build cycle.
Androids
Androids deserve a special note because they are often not well understood. Androids are Tolerant and are unaffected by gravity penalties. Because they are tolerant, a player may find that after a full planet has built its first Android, suddenly its population capacity has increased dramatically. The increase is the extra planetary capacity available only to the tolerant Androids, and can be filled only with Androids. Any attempt to ship in normal colonists will see them die on arrival. On some types of planets, with Aquatic and Subterranean races, the largest pop capacity is achieved only when BOTH normal colonists AND Androids are present. Because Androids can farm, produce, or tech on a HG or LG world without any gravity penalties, it is a good idea to ship out all of your normal colonists and fill your HG and LG planets solely with Androids. Because Android workers are Tolerant, they suffer no production penalties for pollution. However, if normal colonists are present, then the pollution penalty kicks in proportionately to the mix of tolerant and non-tolerant population. Androids benefit from Government effects but do NOT benefit from specific race enhancements such as Production +1 or Research +1. Androids require no food but they do consume a point of production each turn. Androids do not produce BCs like normal colonists, so don't build a spaceport on a planet that is mainly populated by Androids.
Military Technology
One of the most commonly asked questions from new players concerns what weaponry to put in ships early on, versus the mid-game or the end game. We will answer this question specifically, but first there is a general observation to be made. Almost without exception, a fully modified "primitive" weapon is more destructive and more efficient than your most recently researched "advanced" weapon. For instance, if you have just gotten to Neutron Blasters, it is FAR better to arm your ships with fully modified (Enveloping, Continuous) Fusion Beams than with unmodified Neutron Blasters. This also holds true for all missiles.
Not recommended, but the earliest "emergency" weaponry that packs a punch is Fighter Bays (you need to get Battle Pods as well to put a single Interceptor Squadron in a Frigate, a Destroyer can carry two squadrons, three with Battle Pods). If you need to get some combat power up very early in the game, Fighters are your best bet. Note that a Fighter Squadron's firepower is increased by 50% if you get Fusion beams instead of the default Laser beams. Fighters are not recommended because to get them you have to pass up Reinforced Hull, which is usually suicide later in the game.
The best military tech to reach early in the game is Laser beams. To get ANY beam weapon to have a reasonable chance of hitting a target, you need to have Battle Scanners aboard. Conveniently, at the Battle Scanner level, your Laser beams get all available modifications (Armor Piercing, Auto Fire, Continuous, No Range Dissipation). So your earliest military ships should be equipped with Battle Scanners and as many fully modified lasers as you can cram in (tho you will need room for other items, which we will cover under ship design).
The next easiest set of military techs to reach is Nuclear missiles at the Pollution Control or Merculite level, which is the level that allows your nuclear missiles to be fully modified (MIRVed, Fast, Heavy Armor). Again, always use all of the mods.
The next achievable military configuration can come from either of two tracks. You can go for Fusion Beams and then Neutron Blasters (or Neutron Scanners), which allows you to employ fully modified Fusion beams. Or you can get Mass Drivers and then work up to the Warp Dissipator/Class III level, which allows you to employ fully modified Mass Drivers. The Fusion beam track produces more powerful weapons (Enveloping increases damage fourfold for Fusion beams versus Auto Fire which increase damage threefold for Mass Drivers) and also more accurate weapons (the Continuous Mod for Fusion Beams adds +25 to you chance to hit, while the Auto Fire Mod for Mass Drivers subtracts -20 from your chance to hit, which is a huge relative difference. On the other hand, the damage from Mass Drivers does not diminish with range, and the Warp Dissipator/Class III techs are much more useful than either Neutron Blasters or Neutron Scanners. Generally, a race with Creative, Warlord, or Plus Ship Offense should go for Mass Drivers because they will not be so affected by the Auto Fire accuracy penalty. All others should go for Fusion Beams.
The next major increment in firepower comes at the Zortium level, when you can fully modify your Merculite missiles (MIRVed, Fast, Heavy Armor). Mirved Merculite missiles become even more deadly when you reach EMG and can put this mod into the missiles. A single Mirved Merculite EMG missile can reliably detonate a Battleship equipped with Zortium armor and Reinforced Hull if it can get through all defenses and actually strike the target.
Note: I cannot emphasize too much how critical it is to always pick Merculite Missiles. Many players go for Pollution Control instead, but failing to get Merculites leaves you without any powerful missile. Pulsons are an inferior choice because to MIRV Pulsons, you have to go all the way up to the Neutronium Armor level, and a MIRVed Merculite missile does 56 points of damage versus just 20 points for an un-Mirved Pulson missile.
The final major military tech level that is sometimes reachable before an online game is concluded is Gauss Cannon, which are truly awesome weapons when they can be fully modified at the Class VII level. Alternates include Anti-Matter Torpedoes or Phasors. Anti-Matter Torpedoes are particularly useful if your opponent has chosen Cybertronic Computers or is Creative and is therefore capable of shooting down any missile salvos you are likely to launch.
Ship Design
There are a few basics for ship design. The first is that you should always equip every ship with Battle Pods (50% space increase) and every ship larger than a frigate with Augmented Engines (faster in combat but more importantly you get better Ship Initiative, better Attack rating and better Defense rating), and Reinforced Hull (or Heavy Armor if you are Creative). The second basic is that you should ALWAYS equip any ship that is going to carry beam weaponry with Battle Scanners (+50 Attack rating, adds directly to your chance to hit with beam weapons).
The third basic is that you should always avoid mixing beams and missiles on the same ship. There are exceptional times where enemy tactics and ship designs may override this rule, but generally it strongly applies. The logic for this rule stems from the fact that beam ships always need Battle Scanners aboard if they are going to hit anything (+50 Attack rating). Battle Scanners take up a lot of space aboard any ship, and it is most efficient to use that limited space remaining entirely for beam weapons. Putting your missiles aboard purely missile-armed ships allows you to dispense with Battle Scanners and pack in the maximum number of missiles.
I recommend that when you design a ship you use all of the available weapons slots rather than lumping all similar weapons on one line. This affords you more combat options to split your fire. For example, say you have a beam armed ship and you are close to immobilizing an enemy ship you hope to board and capture. If you have all of your beam weapons lumped together on one line, you lose the flexibility to stop shooting after immobilization has been achieved, and may end up firing so much that you blow up your intended target.
The order in which you place weapons on a ship matters. The order in which you place weapons is also the order in which 1) beam weapons fire and 2) missiles and torpedoes strike the target. This distinction can be crucial. Take missiles, for example. Point Defense beam weaponry must do the same amount of damage to shoot down a normal missile as a mirved one. But MIRVed missiles take up a lot more space aboard the firing ship. So it makes sense to place missiles modified with Heavily Armor and Fast, but NOT MIRVed, in the top few rows of your missile ship and place the fully modified (MIRVed) missiles in the lower rows. That way the enemy's shots at your missiles will chew through the less valuable missiles first, preserving the missiles with the most punch. This approach also suggests that you place any EMG equipped missiles in the very bottom rows, so that they will be the last to get shot down, and the most likely to strike the target.
The same logic can be applied to beams. Say your opponent has Class III shields that you will need to punch through to damage his ships. You might place Neutron Blasters, which cannot be made Armor Piercing, in the top rows of your beam ship to blow down his shields and then Armor Piercing Auto-Fire Mass Drivers in the lower rows to inflict the actual damage to his vessels.
Concerning beam weaponry, I recommend a mix of all three weights (Heavy, Normal and Point Defense) on your Battleships. I like to have at least one Heavy beam weapon on each Battleship to prevent the enemy from standing out of range and doing damage while forcing me to charge into his missiles to get into beam range. I will then use two thirds of the remaining space for normal beam weapons and one-third for Point Defense beam weapons. I do not usually create Battleships with different mixes of Heavy, Regular and PD weapons (with one exception), but rather make them all one general design. This way if a particular ship is destroyed, the remainder of my beam firepower is not significantly unbalanced. The exception to this rule is ships equipped with Structural Analyzer (generally only a tech that a Creative will get). For such ships, the overhead of the Structural Analyzer equipment is so high that I tend to put only Heavy beams aboard and use these ships only for offense, meaning that other beam ships will have to protect them from enemy missile fire.
Finally, concerning beam weaponry, I recommend that you always make your beams 360 degree enabled. This is wasteful of space, and may seem inefficient, but the benefit is that your beam ships can encounter an enemy fleet armed with missiles and will not have to stay locked facing forward to fire. Instead they will be able to turn and run from enemy missile salvoes while shooting at those same salvoes for three to four combat rounds. Once the salvoes have been destroyed, then the beam ships can turn around and go after the enemy's ships. A ship with beams facing only forwards will only get one or two shots at the incoming missiles before they strike, which makes it much more likely that it will suffer catastrophic damage.
For missiles, the speed of combat really demands that you pick the ammo load option for just two missile salvoes. Anything higher means that you are shooting so few missiles each turn that the enemy's PD beam weaponry is likely to kill all of your salvoes before they strike. You really need to overwhelm him with mass to win with missiles.
Ship Construction
The first rule of ship of ship construction is to always ensure that every military ship larger than a frigate or scout is built at a planet that has Space Academies. You can start a ship at a planet without Space Academies and then switch Space Academies to the head of the Production Queue before the ship is actually completed, but the ship must be completed AFTER a Space Academy is present. This will give the ship a Regular Morale Rating instead of a Green Morale Rating. Each improvement in Morale Rating adds +15 to a ships Attack and Defense Rating.
I also recommend trying to build a fleet composed mainly of Battleships, rather than smaller craft, simply because this is the most efficient use of the limited Command Points most races will generate. The exception is Warlord races, which have more leeway to build a fleet made of smaller craft.
Combat
Online combat is a very different environment than offline combat, principally because humans are much smarter opponents and move and fight their ships very differently than the computer. They will not simple charge or retreat the way AI empires will, rather they will employ a much broader range of tactics.
Always make sure that you have the following Combat Options turned on: Grid Squares and Missile Warning. This way you can always control your ship moves to avoid things like giving the enemy the ability to move a missile ship into point blank missile range of one of your key ships, or moving your own ship into an enemy EMG missile salvo before you get a chance to fire all of your beam weapons first.
The first thing a player needs to consider, when the combat screen opens, is what his strategy needs to be: retreat, accept defeat but stand and fight to inflict maximum damage on his opponent, or fight to win. So, of course, your first action should be to scan the enemy fleet for capabilities and Leaders. If you decide to stay and fight, then you need to identify which enemy ship(s) are the greatest threat to you. You should then bring the maximum firepower you can bear on the highest threat ship. A common mistake that new players make is to spread their fire among a number of ships. This leaves the entire enemy fleet firing back for a much longer time than necessary. Always try to eliminate the biggest threat and start reducing the enemy's ability to fire back as soon as possible.
The biggest threat may not always be as obvious as you might think. For instance, assume that your missile ships and your enemy's missile ships are the ships most capable of doing damage to each other. You still might want to target the enemy's Point Defense beam ships first to allow your remaining missile salvos to get through unharmed. All other things being equal, you also want to target enemy ships that carry Leaders, since this will hurt your opponent more and cause the loss of their combat bonuses in each combat round after their death.
One of the trickiest questions is whether to charge your ships forward or turn and run for the mapedge. If the enemy possesses significant missile weaponry, it often makes sense to retreat towards the mapedge to get a few extra shots at either the incoming missiles or the missile ships themselves. If the enemy possesses EMG missiles, then it is usually a very bad idea to charge. On the other hand, if you have a lot of beam firepower, you have combat initiative, the enemy has thrown his first missile salvoe at you, and you have the luxury of moving second in the combat round, sometimes it makes good sense to charge forward. The idea is that you charge forward until your ships are just about to get hit by the incoming missiles, and then halt and shoot at them at point blank range. At the start of the second combat round you take the initiative to move first, take a second shot at the missile salvoes, and then move through the remaining missiles to get behind the enemy missile ships. You can then run away from the second salvo, firing backwards at it to attrite it. This maneuver can be quite a surprise to your opponent and very effective.
If you possess a mainly missile armed fleet and the enemy does not have EMG missiles, one very nasty tactic is to fire all of your first missile salvo during your first combat round and then charge your missile ships forward. The second combat round you do the reverse, you charge forward first (at least right up to the point before his missiles are going to hit you) and then fire your second salvo. This technique will usually place BOTH of your missile salvoes hitting the enemy ships in the same combat round, making it very hard for his beam weaponry to stop the strike.
Monster Killing
Monsters are best killed by frigate fleets, since these are easiest to built and ship losses are easily replaceable (losing your first battleship to a monster will almost certainly cause you to lose the game). The best ship for killing monsters, by far, is a frigate equipped with Battle Pods and armed with two Fast, MIRVed nuclear missiles. It is also possible to get the same effect with frigates equipped with Battle Pods and a Fighter, but researching Fighters means skipping Reinforced Hulls, which is normally suicide later in the game. With some monsters it is best to charge forward and hit the beast with missiles at point blank range (this means you must be in grid square right next to the monster). With other monsters this is a bad idea. It is best to run towards the mapedge, firing your missiles backwards at the beast. This little matrix gives you a conservative idea of the fleet strengths needed for different monsters and whether to charge or run:
Monster Frigates Tactic
Eel 10 Charge
Dragon 10 Charge
Hydra 10 Run
Crystal 8 Run
Amoeba 5 Run
These monsters can sometimes be taken out with 1-2 fewer frigates, but you risk missing them entirely. The above numbers will safely guarantee the kill.
If you use Fighters, remember that they will not work well against Dragons (6 Point Defense Phasors will knock out a lot of your fighters before they even fire once). If you choose to attack a monster with your first battleship, you will generally not have the armor to survive more than one or two shots from the monster, so charge to point blank range against ALL monsters and take along two armed frigates as well. Usually the monster will target the frigates first allowing your Battleship to survive.
Kali Rules of Play
There are very few rules of play on Kali, but there are some that are tried and true. Here they are, along with an explanation of why we use them.
Ship Waiting
Definition: In a battle, the Attacker is strictly defined as the player who initiated the combat, regardless of whether he is defending the system or attacking it. The Defender is defined as the player who did not initiate the combat. Note that it is possible for the player owning the system to attack first, and in this first battle he will be defined as the Attacker. If he loses the battle and retreats, his opponent may then have the option of attacking him in the same turn. In this second battle the opponent then becomes the Attacking player.
Rule: Each Combat round during a battle the Attacking player may use the Ship Wait option ONCE. After a ship has been waited once, on its next chance to move it MUST do whatever movement and fire the Attacking player wishes and then the Attacker MUST hit the Done button for that ship. The Defender may wait his ships as many times during a single combat round as he wishes to. This means that the Defender always has the option to move and fire his ships last each combat round.
Reason: Before we invented this rule, each player would wait all of his ships each chance he got to move hoping to get the advantage of firing last (this is not always desirable, but usually is). This meant that the first combat round never even started, and the game would break up with the players fighting over who should have moved and fired first. To eliminate this argument, we invented this rule. If the Attacker does not think he can win a battle if he has to move and fire first, he simply should not initiate it. This also means that pointless battles are not fought and time is not wasted for other players.
Refighting Battles
Rule: If the game crashed in the middle of a combat, both players will refight the battle EXACTLY as they originally did before the crash. While this may be beyond players' memory capacity for a long and large battle, please try to keep faith with this rule.
Sometimes the game will change the order in which players get to initiate combat. If the original Defender now gets the option to attack first, and picks it, then there is no requirement to refight the battle exactly as before. However, if he elects not to attack, then when the original Attacker's chance to start the battle comes up, he MUST take it and both players must refight the battle exactly as before, up to the crash.
Reason: NOTHING will anger your opponent more than watching you lose ships and then refight the battle after the crash differently to take advantage of now knowing what didn't work the first time. This rule avoids a lot of nastiness between players and the destruction of otherwise good playing relationships in the community.
Technology Trading
Rule: Technology Trading between human players is specifically banned for Kali games. This rule may be ignored only if a majority of players vote to ignore it before the game is started. If AI empires are included in the game, players need to agree up front if Technology Trading is allowed with AIs only. Note that Treaties, including Research Treaties, are always allowed
Reason: Technology Trading is fun but the chat and barter consumes a LOT of time and slows down play considerably. We ban it to speed play. Technology Trading with AI empires does not involve a lot of chat, so that is sometimes permitted, though play with AI empires is rare. A further objection to Technology Trading is that it has also been known to allow friends to conspire to help each other while trading with no one else, which is not fair in games where the assumption is every man for himself.
No Orion
Rule: You may scout the Orion system but you may NOT deliberately attack and take the system.
Reason: Orion is often not placed centrally on the map, giving a big advantage to the player who happens to be closest. So for fairness, we ignore it. In online play, your targets are your human opponents, not the Antarans.
Hotseating
Rule: It is extremely easy to gain an advantage in the game by deliberately crashing it during play and hotseating the game offline to review the enemy's position before returning online. It is even easier to hotseat a save. This is strictly forbidden.
Reason: This is considered cheating. You can win this way, but there is no honor in it.
Game Bugs
Most game bugs have been fixed by the wonderful patches designed by Lord Brazen. The following bugs remain (note that some of these only happen in online play):
Retreat From The Mapedge: There is a game bug that will cause the game to immediately crash if you retreat a ship that is touching the edge of the combat map, meaning the results of the whole battle are lost. Always turn on the Combat Option for Grid Squares and NEVER retreat a ship from combat if it occupies a grid square at the edge of the map.
Annihilation: Another bug occurs when you choose to Annihilate a captured enemy population. Once the population goes to zero that planet can remain yours while also being invulnerable to enemy invasion (your opponent drops his marines but the game does not allow him to recapture the planet). This condition usually ends after a random number of turns, but in the meantime it gives the owning player an invulnerable outpost he cannot lose to enemy action. The community does not have a permanent rule to cover this, but I suggest that you agree with your opponents up front as to whether Annihilation is allowed or not.
Androids: Under certain conditions you can build or import more Androids on a planet than the game gives as the maximum pop capacity for that planet. The community has agreed not to abuse this bug, so if a planet reads 17/17 colonists do not add an 18th Android.
Monsters: If two players hit the exact same type of monster on the same turn, both while have combats but one of the two monsters will remain intact even if the player killed it. There is nothing to be done about this, but the player with the surviving monster will be given the option to fight again the next turn if he keeps his fleet at the monster's system.
Learning Techniques
There are a number of very useful learning techniques that you can employ on your own to rapidly pick up useful knowledge.
I strongly recommend that when you first start playing online you hotseat each game after it is finished and study your enemy's technology choices, the allocation of colonists on each planet, his probable expansion pattern, and especially study his ship designs. There is a great deal to be learned from a veteran player's ship designs.
A second excellent learning technique is to play with the Omniscient race pick for your first few games. This is generally not a great race pick for most games, and you probably don't want to do this once you start feeling confident about your skills. But the ability to watch veteran players turn by turn as they develop their empires can teach you a great deal and will give you much more perspective on good (and bad) play than this one writer can. You will then start to win earlier than you might have otherwise.
A third technique, often overlooked, is to ask your opponent after the game is over to critique your play and offer tips. Almost all players in the Kali community will gladly share with you what they think you were doing wrong and what you might try instead. Kali is a mature community and very few of us take any pleasure in beating new players. Our fun starts AFTER you have first beaten us, and we can then enjoy the challenge of playing you. So help us help you by asking as many questions as you want. In my experience, it is the players willing to ask for critiques who start winning earliest.
Having Fun
Even highly experienced offline players can get very frustrated when they first come online by the fact that they keep losing games they feel they should have won. This is only because online play against humans is very different from play against the computer. After observing literally over a thousand new players come online for the first time, I suggest that you should expect to lose your first 10-20 games online. This is perfectly normal and does not mean you are not a good MOO player. If you can stick with the frustration through those first 10-20 games, and if you are willing to adapt to the different conditions of online play, you should enjoy many hours of great fun.
About The Author
Cybersaber has been playing MOO II online since early 1997, first on TEN and then on Kali. He was also the elected President of the TEN MOO II League and then the Kali MOO II League. The experience contained in this document reflects not only his own knowledge, but also the collective experience of the TEN and Kali MOO II gaming communities. There are many player guides for MOO II available on the web. Most of them are useless for play against humans. The author hopes that this guide will help those players who wish to play human opponents online.

